

Monday, 31 December 2012
Sunday, 16 December 2012
Thursday, 6 December 2012
Free Mobile and DTH Recharge By Sending Sms
Hi To All The Mindbenders,
Today we are Sharing a Website For Sending Sms And Earning Recharges Through them. Yes You Are Going to send and Earn, you can recharge DTH or your mobile and if you are a Posted User Then You are Rewarded by movie tickets.
Steps To Follow:-
Step 1.
Click Here
Step 2.
Fill The Registration form.
Step 3.
Login To Your Email Account and fetch password for your 7waysms site and username will be your mobile no.
Step 4.
Login To Your 7waysms account and verify your phone.

Step 5.
Start Sending Sms and you can also send group sms.
Note:-Try to Recharge when you have 10 rs minimum balance in your account for Assuring Yourself.
Like My Page https://www.facebook.com/themindbenders
Today we are Sharing a Website For Sending Sms And Earning Recharges Through them. Yes You Are Going to send and Earn, you can recharge DTH or your mobile and if you are a Posted User Then You are Rewarded by movie tickets.
Steps To Follow:-
Step 1.
Click Here
Step 2.
Fill The Registration form.
Step 3.
Login To Your Email Account and fetch password for your 7waysms site and username will be your mobile no.
Step 4.
Login To Your 7waysms account and verify your phone.
Step 5.
Start Sending Sms and you can also send group sms.
Note:-Try to Recharge when you have 10 rs minimum balance in your account for Assuring Yourself.
Like My Page https://www.facebook.com/themindbenders

Tuesday, 4 December 2012
Recovering The GRUB 2 Boot Loader To Protect Your Previously Installed Operating Systems
Hi To All The Mindbenders,
As Like My Earlier Tutorials i'm not Going To Consume your important time. I am Always here to provide all The Mindbenders readers a Quick and Easy Solutions.
i already posted a tutorial about Recovering Grub2 but That Was Too Advance To Learn Recovering Grub2.
Grub is similar to boot-manager(Bootmgr) of windows.
But i'm a Linux Lover And Proudly Help Someone Who wants To Stay With Linux Distros.
Now We Are Looking Forward To This Post.
Note:- 1. only commands(text) in red must be typed in your terminal.
2. Text in green after ===> sign indicates the uses of commands you are using at that
instant.
3. sda5 is my partition having Linux OS, so Don't Behave Like Monkeys Use step 1 to
identify your Linux Partition Generally it is In Form Of Ext4 or Ext3 or something like
these Formats and for your Convenience Command will show you Linux in front of
your Partition.
4. Refer To My Video For Better Results.
Steps To Follow:-
Step 0.
Boot from live Linux or backtrack 5 flash drive or any boot-able media of your choice, it could be your Dvd.
Step1.
Figure out where you need to install grub 2 means we need to identify our Partition having Linux.
root@bt:~# sudo fdisk -l =================> List All Partition
root@bt:~# ls =================> List All the Files/folders of your
current mounted partition having root
Privellages
Step2.
Mount the Partition where you need to install the grub2
root@bt:~# sudo mount /dev/sda5 /mnt ========> here sda5 is the partition where linux
is and we mounted in mnt folder
root@bt:~# mount ================> List all the mounted partitions
Step3.
Mount the Partition to an alternate location
root@bt:~# sudo mount /dev/sda5 /mnt/boot
Step4.
Create an unbreakable link from /dev folder on the live image you booted from to the /dev folder on the partition you mounted to /mnt
root@bt:~# sudo mount --bind /dev /mnt/dev/
Step 5.
CHROOT from the live image's root to the mounted partition's root
chroot temporarly changes the root of the filesystem directory.
root@bt:~# pwd ================> Print Working Directory To Check
The Current Root Privellages
root@bt:~# sudo mount ================> List All The Mounted Partitions
root@bt:~# pwd
root@bt:~# ls =================> List All the Files/folders of your
current mounted partition having root
Privellages
if yoou found your linux hard drive content then you are almost on track
Step 6.
Now Reinstall the grub2 loader to the drive on which exists the partition you mounted previously.
root@bt:~# sudo grub-install /dev/sda ==========> Install Grub In Your Hard Drive
Which is sda your primary hard drive.
root@bt:~# pwd
now exit your chroot shell
root@bt:~# exit
Step7.
cleanly unmount all the partitions you previously mounted
root@bt:~# sudo umount /mnt/dev
root@bt:~# sudo umount /mnt/boot
root@bt:~# sudo umount /mnt
now reboot...
root@bt:~# sudo reboot
pull out your live flash disk
when Linux or backtrack says to login simply login and do not try to type startx in case of backtrack Use below Command Before typing startx.
And for other linux, Login To System and then open terminal then use commands.
root@bt:~# os-prober
root@bt:~# update-grub
root@bt:~# startx =================> Only For Backtrack Linux
As Like My Earlier Tutorials i'm not Going To Consume your important time. I am Always here to provide all The Mindbenders readers a Quick and Easy Solutions.
i already posted a tutorial about Recovering Grub2 but That Was Too Advance To Learn Recovering Grub2.
Grub is similar to boot-manager(Bootmgr) of windows.
But i'm a Linux Lover And Proudly Help Someone Who wants To Stay With Linux Distros.
Now We Are Looking Forward To This Post.
Note:- 1. only commands(text) in red must be typed in your terminal.
2. Text in green after ===> sign indicates the uses of commands you are using at that
instant.
3. sda5 is my partition having Linux OS, so Don't Behave Like Monkeys Use step 1 to
identify your Linux Partition Generally it is In Form Of Ext4 or Ext3 or something like
these Formats and for your Convenience Command will show you Linux in front of
your Partition.
4. Refer To My Video For Better Results.
Steps To Follow:-
Step 0.
Boot from live Linux or backtrack 5 flash drive or any boot-able media of your choice, it could be your Dvd.
Step1.
Figure out where you need to install grub 2 means we need to identify our Partition having Linux.
root@bt:~# sudo fdisk -l =================> List All Partition
root@bt:~# ls =================> List All the Files/folders of your
current mounted partition having root
Privellages
Step2.
Mount the Partition where you need to install the grub2
root@bt:~# sudo mount /dev/sda5 /mnt ========> here sda5 is the partition where linux
is and we mounted in mnt folder
root@bt:~# mount ================> List all the mounted partitions
Step3.
Mount the Partition to an alternate location
root@bt:~# sudo mount /dev/sda5 /mnt/boot
Step4.
Create an unbreakable link from /dev folder on the live image you booted from to the /dev folder on the partition you mounted to /mnt
root@bt:~# sudo mount --bind /dev /mnt/dev/
Step 5.
CHROOT from the live image's root to the mounted partition's root
chroot temporarly changes the root of the filesystem directory.
root@bt:~# pwd ================> Print Working Directory To Check
The Current Root Privellages
root@bt:~# sudo chroot /mnt
root@bt:~# sudo mount ================> List All The Mounted Partitions
root@bt:~# pwd
root@bt:~# ls =================> List All the Files/folders of your
current mounted partition having root
Privellages
Step 6.
Now Reinstall the grub2 loader to the drive on which exists the partition you mounted previously.
root@bt:~# sudo grub-install /dev/sda ==========> Install Grub In Your Hard Drive
Which is sda your primary hard drive.
root@bt:~# pwd
now exit your chroot shell
root@bt:~# exit
Step7.
cleanly unmount all the partitions you previously mounted
root@bt:~# sudo umount /mnt/dev
root@bt:~# sudo umount /mnt/boot
root@bt:~# sudo umount /mnt
now reboot...
root@bt:~# sudo reboot
pull out your live flash disk
when Linux or backtrack says to login simply login and do not try to type startx in case of backtrack Use below Command Before typing startx.
And for other linux, Login To System and then open terminal then use commands.
root@bt:~# os-prober
root@bt:~# update-grub
root@bt:~# startx =================> Only For Backtrack Linux
Story Behind The Tutorial:-
I know how much it hurts when you Wants to upgrade but instead of that You Got Problems Like Previously installed linux or any other os is missing from your boot and i got the same situations when i was upgraded to Windows 7 to windows 8 Rtm. i was shocked when i rebooted my Laptop and didn't find my previously installed backtrack 5 grub menu, i can't tell you how much sad i was at that time then i asked everyone But i had a Huge List Of No Hahah. And Finally Referred to some Linux Forums And Found the Fix... Then I Recorded a video of fixing the same in ubuntu...
Monday, 3 December 2012
How to burn ISO to CD/DVD very easy method

Hello To All The Mindbenders,
Many friends of mine are concious about burning the disk image ISO file to CD/DVD. They have use lot more softwares like Nero burning ROM etc but when they burn bootable ISO of any disk it doesn't boot. Just written as simple DATA CD/DVD. So here is the smallest software or tool to burn your ISO to CD/DVD
This is the very easy and simplest way to burn your ISO file to CD/DVD. Just follow these steps
- Download and Run your Burn CD CC program.
- Click the Browse button to select your ISO file.
- Click the drop down list and select your CD/DVD writer.
- Select speed of disk writing.
- Click Start to start writing ISO
NOTE: When you click Start it will open your selected drive to inset empty disk. If the disk is already inserted then close your writer and click Start again
Comments & Suggestions are welcome...
Sunday, 2 December 2012
Install Windows Xp From USB Drive

There is a windows 7 usb/dvd download tool for bootable windows 7 usb disk creator but what for windows xp ? There are several ways in which you can install windows xp from your usb flash drive or pen drive or external portable HDD. But of course, you want to know the easiest way. I have seen complex steps mentioned on other websites guiding on how to create bootable windows xp usb drive for installing windows xp from pen drive instead of cd disk but those steps are confusing and tedious for simple and new users who prefer ready made tools to get their job done. SO, I came to know about a software which creates bootable usb drive containing windows xp setup..
Requiremets :
Your windows xp cd or windows xp complete setup files.
Download WinTOflash program from here.
Download Wintoflash now
This program is ad-supported and hence if you want to avoid irritating ads while this program creates your bootable usb, just disconnect from internet during that process.
After downloading wintoflash program, install it and then run it. It will ask for windows xp setup file location is the source box and in the target box, locate the pen drive letter path. Click on Next and go grab a cup of coffee. It will format your pendrive and then make it bootable copying all the files needed for windows xp setup. When it finishes. Just restart the computer and boot from the usb pen drive.
Note: To boot from USB drive, your bios must support usb boot. You should check that in your bios settings and the priority for usb boot should be prior to hdd boot.
If you face any problem in any step, just comment here and we’ll try to resolve your problem.
Tuesday, 27 November 2012
Making BackTrack5 look like XP | Social Engineering
Hello to All The Mindbenders,
Okay, so the first thing you’re wondering is
“Why the hell would you want to do this?”
Well the answer becomes more obvious when the scenario is set:
You’re on a social engineering job and you’ve managed to gain access to the target building, you walk around for a bit to see if any of the desks look free. After a while you decide to sit down at what seems like an unoccupied desk. You calmly pull out your laptop and turn it on. As the laptop is booting you start looking for an Ethernet cable to plug into your laptop, you find one and plug it in. Social engineering phase complete, pentest about to start. The hard work is over and the fun is about to begin…. until, someone walks past your laptop and sees you’re bright red coloured BackTrack wall paper.
You’re on a social engineering job and you’ve managed to gain access to the target building, you walk around for a bit to see if any of the desks look free. After a while you decide to sit down at what seems like an unoccupied desk. You calmly pull out your laptop and turn it on. As the laptop is booting you start looking for an Ethernet cable to plug into your laptop, you find one and plug it in. Social engineering phase complete, pentest about to start. The hard work is over and the fun is about to begin…. until, someone walks past your laptop and sees you’re bright red coloured BackTrack wall paper.
this one is nice trick just keep it low. you know what i mean.
you dont want to have that Big red dragon logon on your screen. let them tought it was a noob OS lol :P
you dont want to have that Big red dragon logon on your screen. let them tought it was a noob OS lol :P

You’re no longer being stealthy, the wallpaper looks aggressive and the nature of your visit is becoming a concern to the other workers who realise they’ve never seen you before. Next thing you know you’ve been collared by security and before you know it you’ve kicked out of the building, all because of the wallpaper on your laptop!
This script originally came from here but I have neatened it up and got it working with BackTrack. So the idea of this script is to make it quick to turn your BackTrack5 gnome build into something that resembles Windows XP to help you blend in with the crowd.
The package can be downloaded from here (please don’t hotlink as I might move the file to a different server to cope with all the downloads….):

Sunday, 25 November 2012
Customizing Backtrack 5 by Devender Mahto
Like
https://www.facebook.com/themindbenders
Ask
https://www.facebook.com/devendermahto
https://www.facebook.com/devendermahto
Thursday, 22 November 2012
Customizing Firefox to Always Auto Save Password Without Showing Notification
Hello To all The Mindbenders,
While I was screening through the new posts in my blog to see if there are any spam and also any key-logger topic that I can help, I saw an interesting question asked by Karan. He wanted to know if there is anyway to make Firefox auto save password without clicking the Remember button. In Firefox, even if you have the option “Remember passwords for sites” checked in Tools > Options > Security, the browser will still ask the question “Would you like to remember the password for “Username” on website.com?” with three selections which are “Remember Password”, “Never Remember Password for This Site” and “Not Now”. The earlier version of Firefox 3 displays a notification bar at the top of the web browser while from version 4 until the current version 17 displays a popup notification at the top left.

Modifying Firefox to auto save the login information to the Firefox Saved Passwords manager without prompting was easy for version 3 because you can directly edit the JS files from the program’s folder to apply the changes. However, the file structure was a bit different starting from Firefox 4 until the current version . We researched and found that it is still possible to force Firefox to auto save the password without the popup notification.
For Firefox 3, all you need to do is edit the nsLoginManagerPrompter.js file with a text editor preferably Notepad++ located in C:\Program Files\Mozilla Firefox\componenets\ folder. Search for the showSaveLoginNotification : function and replace the whole code that is highlighted in yellow…

With the following code(text in red):
var pwmgr = this._pwmgr;
pwmgr.addLogin(aLogin);
The end result would look like the image below.

Save the changes that you’ve made on the nsLoginManagerPrompter.js file and whenever you login to any website, Firefox will auto save the site, username and password to the login manager WITHOUT showing the notification bar. You can access the saved password area by going to
Tools > Options > Security and click the Saved Passwords button. There is one possible bug which is even when a user entered the wrong username or password, it will still be saved.
As for Firefox 4, it gets slightly difficult because the nsLoginManagerPrompter.js file is archived in an omni.jar file located at C:\Program Files\Mozilla Firefox\ folder.
Starting from Firefox 5, you may have noticed that editing the nsLoginManagerPrompter.js inside omni.jar file does not work. The Firefox developing team did not fix the bug nor improve the security but instead they optimized it further by making Firefox load a compiled binary version of the nsLoginManagerPrompter.js file instead of the raw and editable JS file. Here is what you need to do to enable auto password saving on Firefox 5 and above. Do take note that the omni.jar file has been renamed to omni.ja starting from Firefox 10.
1. Use WinRAR, PowerArchiver or WinZIP to open the omni.jar or omni.ja file from C:\Program Files\Mozilla Firefox\ folder.
2. Navigate to jsloader\resource\gre\components\ and delete the nsLoginManagerPrompter.js file.

3. Go back to the root of omni.jar or omni.jar, and navigate to components folder. Edit the nsLoginManagerPrompter.js file and replace the whole showSaveLoginNotification : function as shown earlier. Save the changes and go back to the archiver. Click the Yes button when the archiver prompts you to update the archive with the updated file.
If you are having difficulty in following all the steps above, we provide an already modified version of omni.ja file for Windows version of Firefox 17 which can be downloaded by clicking here or click here for Mac OS X. Simply download and save it to C:\Program Files\Mozilla Firefox\ folder in Windows. In Mac OS X, click Go at the Finder toolbar, select Applications, right click on Firefox and select Show Package Contents. Open Contents folder and copy the omni.ja to the MacOS folder. Remember to backup the original omni.ja file in case you want to restore back the changes.
Important Notes:
1. Whenever Firefox gets updated, most likely the omni.ja file will be reverted to the original
How to Install BackTrack 5 Proper Tutorial

For Security Researchers who wants to do penetration testing or some extra in Security Field then Backtrack 5 is a good choice...
First you need to download backtrack 5 from this link
http://www.backtrack-linux.org/downloads/
and also download UNetbootin which is required For Creating Live Usb Of backtrack
http://unetbootin.sourceforge.net/
Requirement :
1. USB (Flash Drive) (Minimum USB Drive capacity 4 GB)
2. Backtrack 5 ISO file, md5sum verified(which is available on above link)
3. UNetbootin
Procedure to burn your USB.
> Plug in ur USB Drive
> Format the USB drive to FAT32
> Start Unetbootin and select the "diskimage" option, choose a BackTrack 5 ISO file which u've
downloaded at the first of this tutorial.
> Select the amount of space to use for persistence in MB (optional)
> Select your USB drive and click "OK" for creating a bootable BackTrack USB drive
> Once rebooted, remember that the default username is root and password toor
Your USB is ready to install BackTrack5...
first of all Boot the Backtrack Live Environment.
At the bash prompt, type startx to enter the GUI.
Double click the install-Backtrack.sh which u can see on the Desktop.
step by step Installation process...
Select the language and click on the forward button.
Select ur geographical location and time zone den click on the forward button.
Choose ur keyboard layout, or leave default.
now in the next screen choose the "Erase and use the entire disk" option If you Want To Format your whole hard drive and install only backtrack in a single partition,
or choose "manually advanced" option to select the drive you want to format and install backtrack.
and click Forward.
the next screen will show you the installation options, make sure everything is fine then click on forward button to start installation process.
when installation will finish you'll need to press the restart button and then enjoy Backtrack 5.
NOTE : default user name is : root and pass : toor
Dont forget to change it...
you can also use BackTrack 5 with different operating systems like Win XP, Win 7,etc with dual boot setup.
K33p growing, And K33p Yourself updated.
I Enjoyed the whole tutorial While Blogging.
Comments are welcomed...
Backtrack not Found After Installing new windows 8 ? Solved

Problem:
I had Windows 7 installed, and backtrack R2 (just upgraded to R3). I then installed Windows 8 (formatted my Main windows HDD, not my backtrack HDD). Now Windows installed his boot loader.
I Faced This Problem And Tackle My Worries Without reinstalling Any Os... I'm too Smart.
Coz I Know That If there is a problem then There is a solution for it also...
So, Is there anyway to get the GRUB loader back without reinstalling backtrack?
Solution:
Just please one thing that is not written in guides and I belive they take it for granted: If you are to recover the grub using a live CD, here is the "taken for granted" issue and looks pretty logic, but many many people do not do it: use the 64 bit distro if trying to recover a 64 bit system with grub, and use 32 bit live cd for 32-bit distro to recover...IF you do not do that, when recovering grub, you will get mounting errors ("chroot: cannot run command `/bin/bash': Exec format error").
Here is the way I do it, is the easiest way from live cd (remember to use the 32 or 64 bit version according to the one you want to recover):
Insert Live CD (Ubuntu distro with grub2 like Lucid 10.04) and load Ubuntu.

then open a terminal and type(text in red only):
root@bt:~# sudo fdisk -l ====> (See your BT partition: sda1, sda2, etc)
root@bt:~# sudo mount /dev/sdax /mnt ====> (mount it) {Where x is your sda drive
no. eg: sda7 is my drive and here x is 7}
root@bt:~# sudo grub-install --root-directory=/mnt/ /dev/sda ====> (install grub, here DO
NOT install in sdax, just sda or
whatever your HDD is mapped at).
Reboot (# shutdown -r now) and if any OS is missing in grub menu, just enter BT and use the
root@bt:~# os-prober
command in terminal: "os-prober",
then just update grub:
root@bt:~# update-grub
Now You Are Free To Use Your Dual Boot System... Ready... :D
Be Brave, K33p Yourself Updated...
Suggestions and Questions are welcomed...
Sunday, 18 November 2012
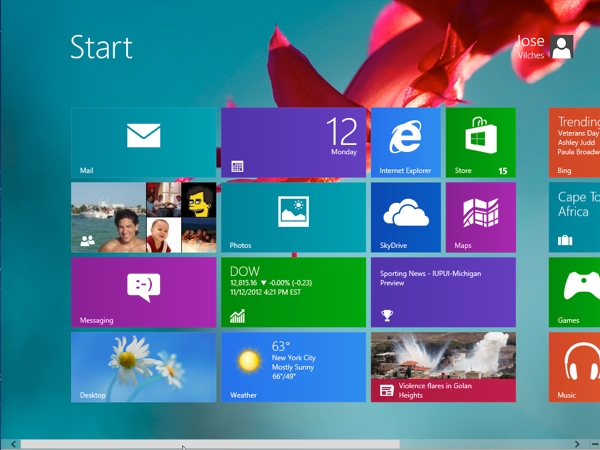
How to Change the Start Screen Background in Windows 8

Hello To All The Mindbenders,
Windows 8’s new Start screen has been hotly debated since the operating system launched in preview mode earlier this year. Acknowledged by some as a bold step into the tablet market, and criticized by many others who prefer the familiar desktop experience, the new 'Modern UI Style' home is here to stay. But beyond not offering a way to bypass this screen (not without the help of third-party utilities), surprisingly Microsoft is also limiting your options when it comes to customizing the Start screen's appearance. You can choose from a couple color schemes and 10 stock background images, but that's about it.
We've seen some workarounds before but they require firing up the HEX editor to modify system files, and you are still limited to 256-color background images in a handful of specific sizes. That’s more work than most people are probably willing to bother with and as you can imagine the results are not quite optimal.
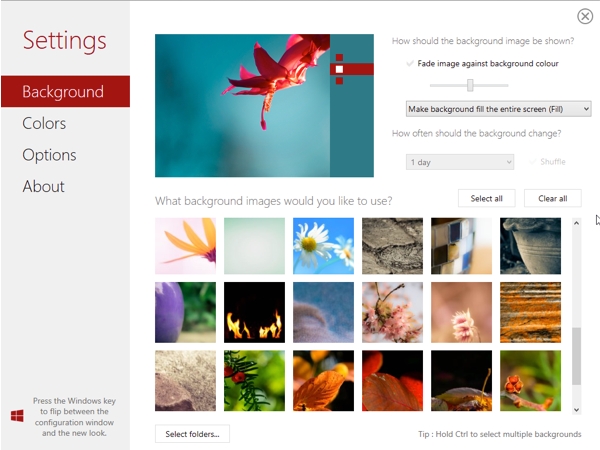
Enter Decor8. Stardock’s latest Windows 8 customization app removes this limitation by giving users the ability to pick any picture they want, regardless of size or color range, as the Start screen background.
The program is pretty straightforward to use. Upon launching Decor8, you’ll be presented with a set of background images to choose from, including the start screen and desktop background images that Windows 8 ships with and also a set of wallpapers that Stardock ships with the app. You get the usual fill, fit, tile and center options available in the classic desktop, and the program will automatically create a color scheme to match each of your background images -- or you can manually customize the color scheme if you’re so inclined.
You can add folders to the program to use your own photos and images as background. There’s also the option to select multiple background images by holding down the Ctrl key, and have them rotate on a set time interval, as well as the option to fade background images against the start screen color for a subtle effect.
Sadly, Decor8 is not free. Stardock offers a free 30-day trial but otherwise asks a modest $4.99 for the app. It’s a little unnerving to pay for such basic functionality but if you wish to customize the Windows 8 Start screen beyond what Microsoft offers this is the easiest-to-use tool we’ve found. It does one thing and it does it well.
Opera Mini For Airtel Free Gprs Browsing
Hi To all,
The Mindbenders
I am Using Opera Mini From Last 2 years for free gprs but nowadays Airtel Is Strict About his Open Ports And Proxies...
So After Bearing a lot of tensions we have an opera mini browser for browsing internet, so that you can sms someone without paying or be in touch with your friends on facebook & gmail.
Working On Zero Balance...
K33p Yourself Updated With The Mindbenders...

Leave Your Comments Below If You Want To Ask Something...
Admin Page Finder For Pro

Hi To All The Mindbenders,
We Face Many Problems When There is a need of website admin page so as usual without wasting your time i have a smart and simple idea to find admin pages of most common website type like php, HTML, Java, etc. I Am Introducing a Perl Script For Finding Admin Pages.
Follow Me...
Step 1.
Download Active Perl
Download For Linux
Download For Windows
Step 2.
Download Admin Page Finder from below link (Download)
Download
Step 3.
Using admin Page Finder In Linux (suppose you placed your admin finder scripts in root folder)
Refer To The Gif Image Below
<1>
Initialize your admin finder
root@bt:~# perl Admin_Page_Finder_By_Devender_Mahto.pl
<2>
Type name of your site
Eg:- www.google.com
<3>
choose language in which site is designed and developed for example in my case its php
to choose just type 1 for php etc.
<4>
Keep loking for something like this
[FOUND] www.yoursite.com/something.php
Comments For Your Doubts...
And K33p Busting Your Victim's Like Pro...
39J0Y
KGB Archiver: Compress 1GB File to 10MB

Hello To All The Mindbenders,
KGB Archiver is free and open source software which compresses 1GB file to 10MB file.
Data compression utility of this software is based on PAQ6 algorithm which has AES-256 powerful encryption. KGB archiver works on both Windows and Linux operating system. Compression ratio of this software is very high. Due to high compression levels, time to compress a file goes high as the size of the file increases and compression ratio may vary depending on the format of the file.When a file is compressed with KGB Archiver it saves it with own extension and at the time of decompression it automatically recognizes the file format. The only limitation of KGB archiver is, decompressed file cannot be open or extract with other compression softwares. You can also choose any compression level (high, maximum, normal, low, very weak) to compress a file but the compression time will vary according to your selected compression level.
Note: If you are compressing any file with KGB archiver and sending the comprssed file to your friends then he must have KBG archiver installed on his computer to decompress the file.
System Requirements:
Due to high compression ratio of KGB archiver, you need to have a decent system hardware configuration- 256 MB RAM
- 1.5 GHz Processor
Features of KGB Archiver
- Supports native .kgb files and .zip files
- AES-256 Encryption
- Able to create self-extracting archives.
- Multilanguage supports like Arabic, German, Greek, Japanese, Spanish many more.
- Unicode is supported in both User Interface and File Systems.
- An Explorer shell extension is available for the windows version.
- Make Password protected compressed file
Click Here To Download KGB Archiver
Note: This KBG Archiver software cannot compress video format files.

Friday, 16 November 2012
How to Get Rid of the Non-Essentials Features Of Your Gmail Account

Good Morining Friends,
I’ve been running a Minimalist Gmail setup lately, stripped of nearly everything but, you know, emails … and I’m in love with its simplicity.
There’s something pure about having nothing but the essentials.
Now, some of you will recall a couple of other posts I did, and let’s quickly review them for background:
So, two things: one, I haven’t completely killed email. I still use Gmail, though not as often. I have moved most of my communication to Twitter, Google Docs, a wiki, and Basecamp. But I still do email, a little. It’s a hard thing to kill, but maybe drastically reduced email usage is OK with me. It’s certainly less stressful.
Two, when I do use Gmail, lately, I am bothered by all the clutter. I removed all the gadgets, and still too much. Google is known for its simplicity, but I really wanted to strip out not only ads but chat and the navigation menus at the top and more. So I did.
I’ve used Greasemonkey for Firefox and some great user scripts, listed below, to achieve this. I thought of rewriting Gmail’s CSS, but user scripts are much easier. It didn’t take long — just Googled every little thing I wanted to do, and found others had already solved the problems, one at a time.
Here’s how I’ve made Gmail into a minimalist inbox:
1. Fire and Grease. First, be sure you’re running Firefox withGreasemonkey installed. I love the minimalism of Google Chrome — been running both the dev version and latest Chromium builds — but unfortunately it can’t do what Greasemonkey can, at the moment. So I mostly just use Firefox for Gmail now.
1. Fire and Grease. First, be sure you’re running Firefox withGreasemonkey installed. I love the minimalism of Google Chrome — been running both the dev version and latest Chromium builds — but unfortunately it can’t do what Greasemonkey can, at the moment. So I mostly just use Firefox for Gmail now.
2. Remove gadgets. First thing I removed was gadgets — go to Settings, then Gadgets, and remove any you have installed. I had Twitter and Delicious. Then I went to Labs under Settings, and disabled “Multiple Inboxes” and the Google Docs and Google Calendar gadgets, as well as the option to move the Chat box to the right side of Gmail. Things were starting to get cleaned up!
3. Hide labels, chat, footer. I really wanted to remove chat but couldn’t figure it out. Also, the clutter in Gmail’s footer was bothering me. So I found this brilliant user script: Gmail 3: Hide Labels, Chat and Footer. Install it in a click, and voila! Lovely.
4. Remove ads. Ads on the right side of email messages also bothered me. Found a script to do this: Gmail Ad Remover. Added benefit of maximizing your screen space for messages.
5. Remove stars. It’s a minor thing, but the stars are unnecessary for me. I don’t use them for task management (did at one time), so what’s the point?Gmail Remove Stars to the rescue.
6. Gmail logo and searchbar. Found Gmail toggle searchbar area script. Cleans things up nicely. You can always toggle the search area back on if you need it, but most of the time when I’m processing email, responding, I don’t need this.
7. Menu navigation bar. This was the most annoying. I couldn’t figure out how to remove the navigation menus that run across the top of Gmail. Then found the Gmail Real Estate script. It actually toggles not only the navigation menus, but the search area too. This somewhat duplicates the logo and searchbar script’s function above, but I’ve found they actually work nicely together, allowing you to show just a minimal navigation bar if you like, or whatever you feel like showing at the moment. I normally have everything minimized.
Updated: 8. Clean up rows and remove the “inbox is empty” message!
Now two excellent Greasemonkey scripts. The first, called Gmail Clean Rows, removes the lines and other clutter from your inbox’s list of emails. The second is called Gmail Empty is Empty, and removed a small annoyance of mine — the message that shows up when your inbox is empty that says “No new mail! Want to read updates from your favorite sites? Try Google Reader”. Now the empty inbox is really empty, which is lovely lovely.
Updated: 9. Remove extraneous buttons. I took it a step further, at my fans request, and wrote Gmail Inbox with Less Buttons, removing all the buttons above and below the inbox, except archive, report spam and delete. This is perfect, because I don’t have a need for the move-to, label or more actions drop-down buttons, or the refresh link, or the Select links below all the buttons. Your needs may vary.
And that’s it. It might sound complicated, but basically it’s turning off some options in Gmail’s settings, and then installing a few user scripts. It should just take a few minutes. See the before and after pics below.
How I Use Gmail, the Minimalist Way
Now that everything is stripped down — no gadgets, no chat, no labels or stars — I just process and reply to email, and empty my inbox. Here’s how:
Now that everything is stripped down — no gadgets, no chat, no labels or stars — I just process and reply to email, and empty my inbox. Here’s how:
1. Use keyboard shortcuts. See this list if you don’t already know them. Pressing a key such as “c” or “r” or “a” to do email messages, or “j” or “k” or “x” or “y” to navigate and select and archive, is much faster than using the mouse. I can process very quickly using shortcuts.
2. Remove all unnecessary incoming email streams. Very important. Unsubscribe from all newsletters, all ads sent to you from businesses, all notifications from other services you use. Filter out messages from people who just forward jokes or chain mail. I no longer publish my email address, and give people other options for getting the info they want, so only my closest friends or business partners email me. Leaves the inbox relatively uncluttered.
3. Process quickly. Just run through your inbox, processing like lightning. Each email requires instant action: archive or trash, reply then archive, put on your task list (see next item) and archive. Or just do the task now, and archive. Those are the only options. Should take 10 minutes tops.
4. Tasks. I use a separate task list these days (Anxiety, a very simple Mac app) to make a quick note of any tasks, so that I can archive an email without needing it in the inbox as a reminder. Gmail Tasks is another good option — I don’t use it these days because I keep my email closed most of the time, and want my small task list open when I need it without having to open Gmail.
5. Short messages. Keep things short, and it doesn’t take long to reply. I try to do it in 3-5 sentences. I rarely go over this.
Before and After Pics
Took some screenshots to illustrate the changes. Click the thumbnails to see full images. Update: I’ve changed the “after” screenshot to illustrate the new scripts noted above by Matt Constantine.
Took some screenshots to illustrate the changes. Click the thumbnails to see full images. Update: I’ve changed the “after” screenshot to illustrate the new scripts noted above by Matt Constantine.
Edit: The Firefox theme you see in the screenshots is Chromifox Basic, modeled after Google Chrome. I didn’t mention this above, but I removed most of the toolbars and icons from Firefox awhile back, to make Firefox as minimalist as I can. You can do this in the View->Toolbars menu, unselecting toolbars and removing icons as you please.
Before:(inlarge please)

After: ( <> Maximize it)

Comments and Queries are welcome for this Blog...The Mindbenders
Subscribe to:
Comments (Atom)


